Reclaimed Wood Flooring Ideas for Bright, Rustic Summer Interiors
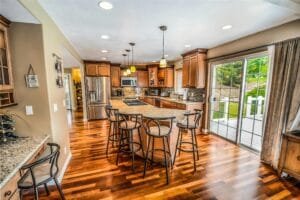
Summer is the perfect season to refresh your home and embrace a lighter, more natural interior style. As homeowners look to create warm, welcoming spaces

To make your wall art, cut the offcuts into various sizes and arrange them on a backing board. You can paint, stain, or leave the wood in its natural state for a rustic look. For a unique touch, consider adding mixed media elements like metal or fabric alongside the wood, turning your DIY Reclaimed Wood Offcut Projects into a one-of-a-kind masterpiece.
To build your shelving unit, cut the offcuts to your desired size and sand them down to smooth any rough edges. Attach the pieces to brackets or directly to the wall. You can create anything from a simple floating shelf to a more elaborate multi-tiered unit. To enhance the wood’s natural beauty, finish it with a coat of varnish or wood stain for added durability.
Simply measure and cut the offcuts to fit your photo or artwork. Sand the edges to smooth them, then assemble the pieces using wood glue or small nails. You can add a coat of paint or varnish for a polished finish, or leave the wood unfinished for a more natural look.
For example, you could stack several offcuts of reclaimed wood to create a unique coffee table. Secure the pieces with wood glue or screws, then add a coat of paint or stain for a personalised touch. This project will add character to your space while blending rustic charm with practicality.
To make a decorative tray, cut several offcuts to form the base and attach handles to the sides. You can use metal or wooden pieces for the handles to match the style of the wood. This simple yet stylish project adds both function and beauty to your home.
You could create a simple planter box to house your favourite plants or build a charming birdhouse to attract wildlife to your garden. These outdoor projects are eco-friendly and add a rustic, natural touch to your outdoor space.
Summer is the perfect season to refresh your home and embrace a lighter, more natural interior style. As homeowners look to create warm, welcoming spaces
Summer is one of the most popular times of year for home improvement projects. With longer days, better weather, and a renewed focus on refreshing

Sustainability is becoming a key consideration in modern construction and interior design. As awareness of environmental impact grows, more homeowners, designers, and developers are looking
Reclaimed wood flooring is more than just a design choice – it’s a journey. Each board has a history, having already served a purpose before